If you want an Apollo Command Module, just build one…
Like many of space-nerds in training who grew up in the 60’s, we longed to have our own Apollo spacecraft or Apollo Command Module. Few get a chance to actually realize that. I started working on my own, around 1969, starting on the panels. Made out of cardboard with red felt-tip lettering for the controls, surplus toggle-switches (5/$1) and “real” buttons that I could press, I stopped after a single panel when I couldn’t figure out how to do a “real” FDAI (the artificial horizon globe) or computer displays. However, Luigi Pizzimenti went ahead and did just that for an aviation museum just out of Milan, Italy.

My cardboard panel, circa-1969, next to a real one.
Luigi is the curator of the lovely Volandia aviation museum, and for the 40th anniversary of Apollo 16 in 2012, he and twenty other volunteers (he worked for free himself) spent a year building a replica of the Apollo 16 command module, Casper.

My panel is on the left. Notice the high-quality red-felt pen lettering.
The project was sponsored in part by The Astronomical Observatory Foundation of Tradate, which operates a publicly accessible observatory in Tradate, part of the Lombardi region in Northern Italy. The main instrument is a 25” fork mounted Newtonian, but they have numerous others for various scientific projects.
Made out of wood, metal, plastic and glass and even the model was unveiled in at a ceremony attended by Apollo 16 lunar module pilot, Charlie Duke.
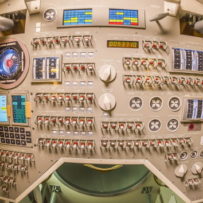
Like the real spacecraft, the computer really works running an emulator of the Apollo Guidance Computer running on a custom system. The caution and warning panels function, many of the switches work and it was built plenty sturdy so people can sit in it (but only for special occasions.) However, may of the internal displays are static due to the difficulty of fabricating them.

The heat-shield proved to be the most challenging part of the project.
The main structure is primarily made out of fir, while many of the smaller details are metal or Plexiglas. Unlike the real CM, the control panel is not backlit, with the actual decals printed overlays. Luigi’s volunteers came with expertise in metal and woodworking, computers and plastic fabrication. It was nice to see that not only did they get the inner details right, but detailed the outer hull as well.

Custom computer running real Apollo software.
The biggest challenge was getting the conical shape with the curved heat shield just right.
The FDAI, or “8-ball” is not functional, but the ball itself was made out of a plasitic globe with careful hand applied decals.

The final main control panel.
No 3D printing technology was used, as it was still a little too premature when this project was started.
When one sees an Apollo spacecraft in person the usual thought was “3 guys spent HOW LONG? In that little thing?”
Thanks to Luigi and his volunteers, that line will be made in Italian, no doubt for many times.

Luigi with finished project.
